/cdn.vox-cdn.com/uploads/chorus_asset/file/24016885/STK093_Google_04.jpg)


/cdn.vox-cdn.com/uploads/chorus_asset/file/24808816/Starfield__The_Settled_Systems___Supra_Et_Ultra_____Starfield__The_Settled_Systems___Supra_Et_Ultra_2023_7_25_94252.263_1440p_streamshot.png)


Have you ever considered limiting the volume of your AirPods? It won’t be for all of us, but there are good reasons for it – maybe it’s your personal preference to keep noise to a minimum, or maybe you just want to reduce the risk of damage to your ears .
Earbuds can actually be a risk when it comes to hearing loss — especially if you don’t have noise-canceling earbuds like the AirPods Pro 2 — because the lack of good sound blocking means listeners often have to listen to their music. Have to turn up the volume for, listen to, podcast or call content if there’s too much noise around you. Non-pro AirPods have very poor passive sound isolation, which means they’re particularly vulnerable to this.
If you’re in a city with traffic around you, that means turning up the AirPods’ volume well beyond the volume of busy traffic — and that’s not good. This means you’re cranking the volume into the danger zone, where prolonged exposure could be a problem. And I don’t mean “for a long time” because you’d have to be in that traffic for 10 hours straight. I mean if you are pushing your AirPods to these volume levels every day, even if for short periods, it could damage your hearing over time.
The AirPods Pro and AirPods Max aren’t at the same level of danger for this, as the active noise cancellation should mean you can hear louder outside sounds better anyway. However, people are often tempted to crank them, so the danger remains.
Thankfully, it’s easy to activate a maximum volume limit for the AirPods on your iPhone, and ensure that the volume remains consistent between different media wherever possible — here’s what you need to know to get started.
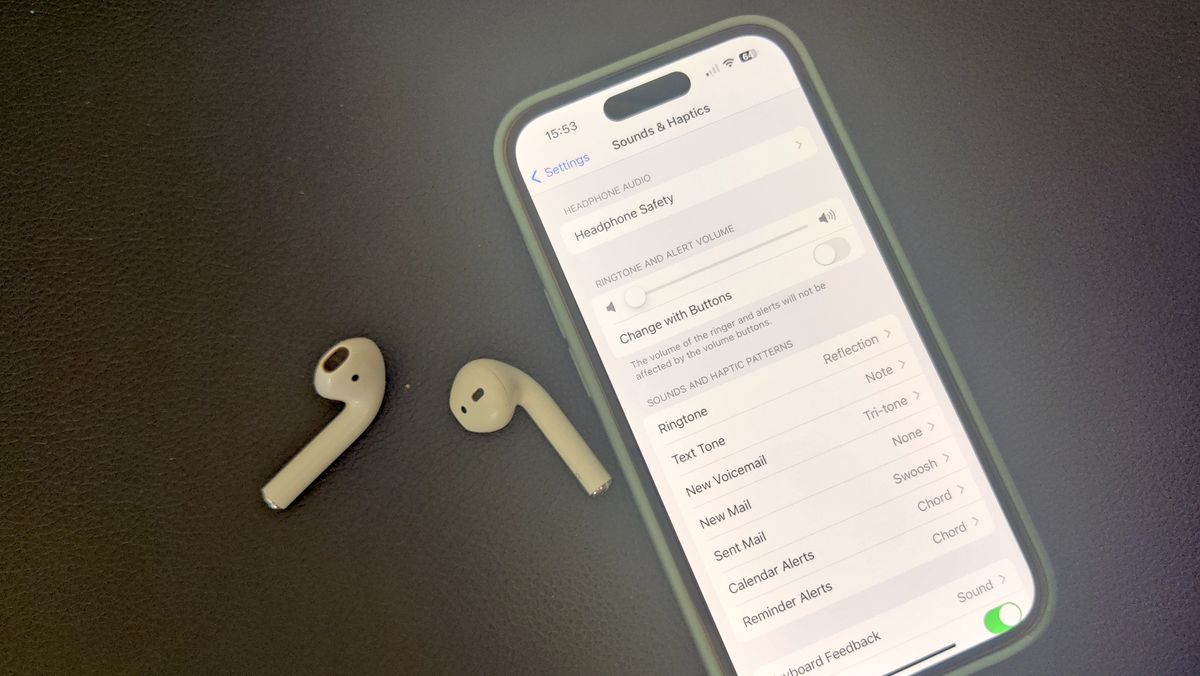
How to Limit the Volume of AirPods on iOS
For iPhone users, it’s very simple – just go to Settings > Sound & Haptics > Headphone Safety, and activate the toggle that says ‘Reduce loud sounds’. When you turn it on, your phone will give you an option to set the maximum volume coming from your phone.
The default setting was 85 decibels (“as loud as heavy city traffic”), while the minimum option was 75 decibels (“as loud as a vacuum cleaner”) and the upper limit was 100 decibels (“as loud as an ambulance siren”).
If you only listen for a few hours a day then 85 should be fine max. If you’re more hardcore and listen to music for hours, choose 80 decibels.
Sound Check: How to stop sudden spikes in sound

There’s one more setting worth activating for your hearing – Sound Check.
Sound Check effectively matches different audio outputs to the same volume to prevent sudden spikes in perceived volume when moving from one track to the next. However, this only works in Apple Music, so it won’t stop, say, YouTube videos much faster than Spotify tracks.
You’ll find this toggle on your iPhone if you go to Settings > Music > Sound Check. If you don’t have an iPhone but use Apple Music on other devices, you can go to Music > Preferences > Settings to activate Sound Check.
It’s worth noting that some music streaming services also have settings to normalize the volume of individual tracks – in Spotify’s case, this is generically called ‘normalized volume’ – so be sure to Check the settings for whatever media app you’re using. play.
